
Table of Contents
Introduction: Are you stuck doing this exact same thing?
At the end of every month, your desk is piled high with a mountain of contracts, notices, or official documents.
Every single one looks almost identical—the only differences are just a few fields like the “Client Name,” “Amount,” and “Date.”
So, you open Word, copy last month’s version, manually change the name, update the date, save it, and then open the next one…
Before you know it, an entire afternoon is completely gone.
In this article, I’m going to show you a better way: treat Excel as your database, Word as your template, and use a short snippet of VBA code. With just a single click, you can automatically generate dozens of documents within seconds. Plus, it will even automatically track which ones are completed and which ones to skip.
The Ultimate Excel-to-Word Automation Template Pack
To help readers who have finished practicing quickly transition into real-world applications, I have prepared a practical contract template pack for everyone to download.


Once opened, you will see a ZIP file available for download. After extracting it, you will find two files: Data and Template. I previously tried leaving them as two separate, uncompressed files, but it wasn’t any more convenient. Additionally, because this project relies on macros, I have embedded the VBA code directly into the file, which means Google’s security filters might be a bit more cautious around it.
(Note: Some readers mentioned they couldn’t open RAR files, so I’ve updated the download to a ZIP file. I won’t be swapping out the screenshots, but rest assured, the new ZIP file is ready for you!)
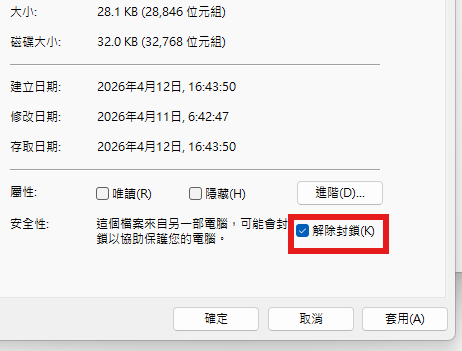
💡 Quick Troubleshooting Tip: If Excel blocks the macros after you open the file, simply right-click the downloaded file, go to Properties, check the “Unblock” box at the bottom of the General tab, and click Apply.


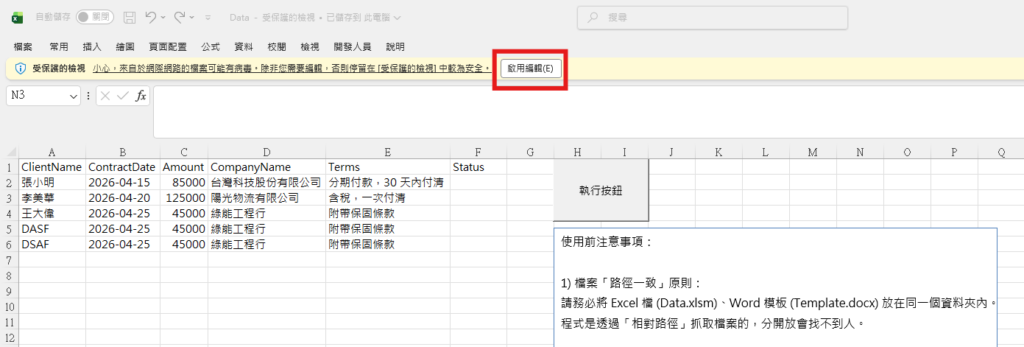
💡 First-Time Setup: When you open the file for the first time, make sure to click “Enable Editing” (and “Enable Content” if prompted) at the top of your screen to allow the macro to run.
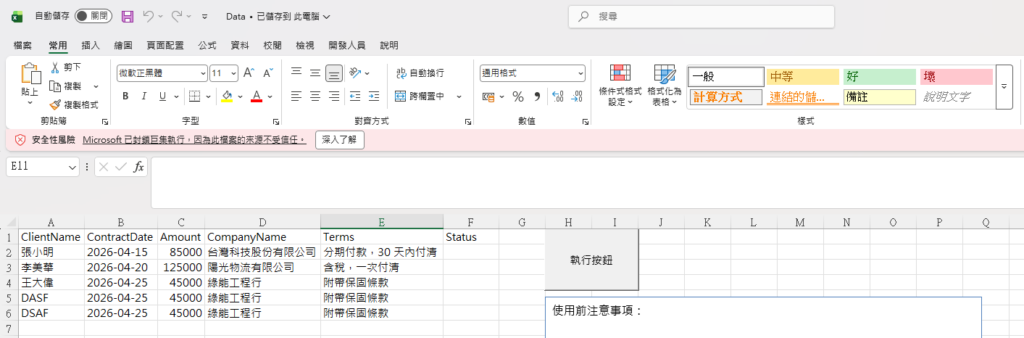
Next, you will likely see a “Security Risk” warning. To fix this, close the Data file, go to your file folder, right-click on the Data file, and select Properties. At the bottom, check the box that says “Unblock” and click Apply.
I walked through these prompts step-by-step just to show you what happens, but in practice, you can actually unblock the file right after unzipping it.
⚠️ A Crucial Security Note on Macros (.xlsm) Whenever you download a macro-enabled file from the internet, you should always close the workbook first, open the Developer tab, and head into Visual Basic to review the code. Macros have massive system privileges and can easily carry malicious scripts if you aren’t careful. You have to be incredibly cautious! This is exactly why you rarely see websites offering full macro files for direct download.
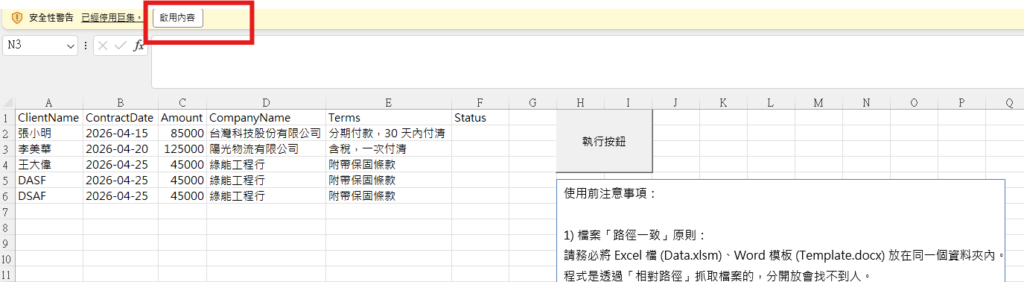
Finally, click “Enable Content,” and you are good to go! If you run into any other operational issues, please refer to the “Before You Begin” section—it functions just like a quick user manual.
A Simple Guide to the Automation Template
After unzipping the package, you will see two files: an Excel file named “data” and a Word file named “Template”. Both files must be saved in the exact same folder path.
When you run the macro for the first time, a new folder named GeneratedContracts will automatically be created in that same path to store the contracts generated from your data. On some computers, the Word files will generate successfully on the very first try; however, certain Excel versions might throw an error during this initial folder creation. If that happens, simply clear the “completed” status in Column F of the data sheet and run the macro again.
How to Run the Macro? I originally created a clickable button for this, but some security settings may automatically strip out buttons when the file is downloaded. If your button is missing, you can easily add one back by following these steps:
- Go to the Developer tab.
- Click Insert and select the Button (Form Control) icon (located in the top-left corner of the dropdown).
- Click anywhere on your spreadsheet, then select the macro named
Sheet1.GenerateWordContractsfrom the list. - Click OK.


The Logic and Workflow Behind the VBA Code
The entire automation process is broken down into four distinct phases: Environment Setup → Launch Word → Loop Processing → Environment Cleanup.
Section 1: Environment Setup — Understanding the First Block of Code
vba
Sub GenerateWordContracts()
Dim wdApp As Object
Dim wdDoc As Object
Dim templatePath As String
Dim outputFolder As String
Dim dataSheet As Worksheet
Dim lastRow As Long
Dim i As Long
Dim rowData As Variant
Dim successCount As Long
Dim skipCount As Long
On Error GoTo ErrorHandler
templatePath = ThisWorkbook.Path & "\Template.docx"
outputFolder = ThisWorkbook.Path & "\GeneratedContracts\"
If Dir(templatePath) = "" Then
MsgBox "error! Template.docx", vbCritical
Exit Sub
End If
If Dir(outputFolder, vbDirectory) = "" Then MkDir outputFolder
Set dataSheet = ThisWorkbook.Sheets("Data")
lastRow = dataSheet.Cells(dataSheet.Rows.Count, "A").End(xlUp).Row
If lastRow < 2 Then
MsgBox "Data no data!", vbExclamation
Exit Sub
End IfVBA
Dim wdApp As Object / Dim wdDoc As Object
These two variables represent “the Word application itself” and “a single Word document.” We declare them as Object because this VBA code runs inside Excel. Since Excel does not natively recognize Word’s specific data types, we use the generic Object type as a placeholder. This technique is known as “Late Binding.” The main advantage is that it eliminates the need to manually check the Word Object Library reference in Excel before running the code.
VBA
On Error GoTo ErrorHandler
This is the safety net for your entire script. If an unexpected error occurs during execution (such as Word crashing or your computer running out of disk space), the program will not crash abruptly. Instead, it will gracefully jump to the ErrorHandler block at the very bottom, clean up the environment, close Word safely, and display a user-friendly error message.
VBA
templatePath = ThisWorkbook.Path & "\Template.docx"
ThisWorkbook.Path automatically retrieves “the folder directory where this current Excel file is saved.” Designing it this way ensures portability: no matter which computer you move this folder to, the path will always remain accurate. This eliminates the need to hardcode absolute paths like C:\Users\Charlie\Desktop\..., which break easily.
VBA
If Dir(templatePath) = "" Then
The Dir() function acts like a sensor checking if a specific path “contains anything.” If it returns an empty string (""), it means the file does not exist. The script will immediately halt and trigger a clear warning message, preventing the program from running blindly and throwing a cryptic system error later on.
VBA
If Dir(outputFolder, vbDirectory) = "" Then MkDir outputFolder
This single line accomplishes two tasks: it first checks whether the designated output folder exists, and if it doesn’t, it automatically creates it (MkDir). The vbDirectory argument tells the Dir() function, “Hey, I am searching specifically for a directory (folder), not a file.”
VBA
lastRow = dataSheet.Cells(dataSheet.Rows.Count, "A").End(xlUp).Row
This is the most famous trick in the VBA world for “finding the last used row.” The logic behind it is brilliant: it starts from the absolute bottom of Column A (Row 1,048,576) and looks straight up (xlUp) until it hits the very first cell that contains data. The row number of that cell is assigned to lastRow. This method is far more reliable than using dataSheet.UsedRange.Rows.Count, which notoriously miscalculates by counting cells that are completely blank but were previously modified.
Here is the professional, well-structured English translation of sections 2 through 4, perfectly optimized for a high-quality WordPress technical blog:
Section 2: Launching Word and Initiating Batch Processing
Line-by-Line Code Breakdown
VBA
Set wdApp = CreateObject("Word.Application")
This line uses Windows COM technology to silently spin up an instance of the Microsoft Word application in the background. CreateObject("Word.Application") is standard VBA syntax, where the string inside the parentheses represents Word’s unique programmatic identifier (ProgID) in the Windows Registry.
VBA
wdApp.Visible = False
This keeps the Word application running quietly in the background, preventing flickering windows from distracting the user. If you want to visually monitor what the macro is doing (which is incredibly useful during debugging), simply change this value to True.
VBA
If UCase(dataSheet.Cells(i, 6).Value) = "COMPLETED" Then
This is the core logic behind our Smart Skip mechanism. The UCase() function converts the text in Column F to uppercase before performing the comparison. This means whether your cell contains Completed, completed, or COMPLETED, the macro will recognize it perfectly. Paired with the code that writes back "Completed", this creates an idempotent operation—running the script multiple times will never generate duplicate files for rows you have already processed.
VBA
rowData = dataSheet.Range("A" & i & ":E" & i).Value
Instead of fetching data cell by cell, this line grabs all values from Columns A through E simultaneously and stores them into a 2D array (rowData). Minimizing trips between VBA and the Excel worksheet significantly boosts execution speed, especially when dealing with hundreds of rows. To access the data, use rowData(1, 1) for Row 1, Column 1 (Column A), rowData(1, 2) for Column B, and so forth.
VBA
Set wdDoc = wdApp.Documents.Add(templatePath)
Pay close attention to .Add(templatePath) here—notice we are not using .Open(templatePath). While .Open directly unlocks and modifies your master document, .Add commands Word to “create a brand-new document based on this template.” This ensures your original master layout remains completely pristine and untouched.
VBA
Format(rowData(1, 2), "yyyy年mm月dd日")
Under the hood, Excel stores dates as sequential serial numbers (for example, 46132). The Format() function converts this raw digit into a readable, localized date format. Similarly, Format(rowData(1, 3), "#,##0") formats currency or large digits with standard thousands separators (e.g., transforming 85000 into 85,000).
VBA
wdDoc.SaveAs2 fileName, 16
Introduced in Word 2010, the SaveAs2 method provides superior stability when handling modern .docx files compared to the legacy SaveAs command. The second argument, 16, is the underlying enumeration value for wdFormatXMLDocument (the native .docx layout format).
VBA
With dataSheet.Cells(i, 6) ... End With
Once a document is successfully saved, the macro writes a "Completed" stamp into Column F of your spreadsheet, styling the font in bold, dark green. If the program crashes mid-run or you manually stop it, you can safely restart the macro later; it will gracefully resume exactly where it left off.
Section 3: The Engine Room — Demystifying the ReplacePlaceholder Function
This helper subroutine acts as the core engine of our automation tool. Every time it is called, it triggers a robust “Find and Replace All” operation inside the Word document, replacing generic tokens like {{ClientName}} with actual, personalized record data.
Parameter Architecture
The function requests three distinct arguments:
wdDoc: The specific Word document object being targeted.findText: The text string token to locate (e.g.,"{{ClientName}}").replaceValue: The runtime value to inject. It is defined as aVariantso it can dynamically accommodate diverse data types (text, numbers, or dates).
Defensive Null & Empty String Handling
VBA
txt = IIf(IsNull(replaceValue) Or IsEmpty(replaceValue), "", CStr(replaceValue))
IIf() serves as VBA’s inline ternary operator. This defensive statement evaluates: “If the target cell value is null or completely blank, swap it with an empty string; otherwise, explicitly cast it into a string (CStr).” This validation step is vital—if you attempt to run CStr() directly on an empty Excel cell, VBA will immediately halt and throw an error.
Deep Dive into Find Object Properties
.ClearFormatting / .Replacement.ClearFormatting
Clears out any lingering font or style parameters from previous search loops, ensuring every find-and-replace cycle starts with a completely clean slate.
.Forward = True
Instructs the search engine to scan downward from the very beginning of the document to the end.
.Wrap = 1 (wdFindContinue)
Tells the engine to automatically wrap back around to the top of the document once it hits the bottom. This ensures that no matter where the invisible document cursor is resting, every single placeholder is caught.
.Format = False
Explicitly tells Word: “Look for matching characters only, ignore styling.” If set to True, a placeholder would only match if its font family, weight, and size identically matched your search filter.
.MatchCase = False
Turns off case sensitivity, meaning tokens like {{ClientName}} and {{clientname}} are treated identically.
.MatchByte = True
This setting is critical for localized double-byte characters (like Chinese or Japanese text). It rigorously distinguishes full-width characters from half-width characters, preventing Word from accidentally mixing up full-width brackets {{ with half-width standard brackets {{. This flag eliminates tricky, hard-to-debug formatting glitches.
.Execute Replace:=2 (wdReplaceAll)
The .Execute method physically launches the search routine. Passing the parameter Replace:=2 mirrors clicking the “Replace All” button inside Microsoft Word’s UI. Changing this to Replace:=1 (wdReplaceOne) would only substitute the first occurrence it encounters.
Section 4: Wrapping Up — Environment Cleanup and Execution Reports
Line-by-Line Code Breakdown
VBA
wdApp.Quit
This closes the background instance of Microsoft Word. If you omit this line, every single run of the macro will leave a hidden, orphaned Word process lingering in your system’s memory. Over time, these invisible processes will pile up and quickly throttle your PC’s RAM capacity.
VBA
MsgBox ... vbCrLf & _
vbCrLf generates a clean line break within native message popups. The space followed by an underscore _ is VBA’s line-continuation syntax, allowing lengthy strings of code to be cleanly split across multiple lines for excellent readability. Once finished, the end-user receives a beautiful, descriptive summary telling them exactly how many files were generated, how many were skipped, and where they are saved.
VBA
Exit Sub
Upon a successful execution run, this statement safely exits the macro, stopping the code from accidentally falling through into the error handling suite below.
The Error Handlers
VBA
If Not wdDoc Is Nothing Then wdDoc.Close False
If Not wdApp Is Nothing Then wdApp.Quit
If something fails mid-process, the code enters a safety routine. It checks if our document or application variables actually hold an active memory reference (Not ... Is Nothing) before forcing them shut. This double-layered safety valve guarantees that even if a fatal error occurs, Word never stays trapped in your background tasks eating system resources.
Section 5: How to Extend and Customize the System
Adding More Fields
If you need to introduce an additional placeholder—such as {{ManagerName}}—simply follow these four steps:
- Update Excel: Populate the new manager name data into Column F of your Data worksheet. (Note: Since Column F was originally used as the “Status” column, you will need to shift the status column down to Column G).
- Update Word: Open your
Template.docxfile and type the placeholder{{ManagerName}}exactly where you want it to appear. - Adjust the Range: Update the data range in your VBA code from
"A" & i & ":E" & ito"A" & i & ":F" & ito include the new column. - Insert the Call: Add a new line of replacement code:VBA
Call ReplacePlaceholder(wdDoc, "{{ManagerName}}", rowData(1, 6))
Exporting Documents Directly to PDF
If your workflow requires non-editable PDF files instead of standard Word documents, look for this line in your script:
VBA
wdDoc.SaveAs2 fileName, 16
Replace it with the following snippet to trigger native PDF conversion:
VBA
Dim pdfName As String
pdfName = outputFolder & "Contract_" & rowData(1, 1) & "_" & Format(Now, "hhmmss") & ".pdf"
wdDoc.SaveAs2 pdfName, 17 ' 17 represents wdFormatPDF
Frequently Asked Questions (FAQ)
Q: Why am I getting a “Template.docx not found” error during execution?
A: Double-check that Template.docx and Data.xlsm are stored in the exact same folder. Additionally, ensure that your Excel file is completely saved to your hard drive. If you try to run the script inside a fresh, unsaved workbook, ThisWorkbook.Path will return an empty string, breaking the file routing.
Q: Why are placeholders like {{ClientName}} left unreplaced in the generated files?
A: This is almost always caused by Word’s hidden formatting or background auto-correct. Even though {{ClientName}} looks seamless on your screen, Word might have internally fragmented it into separate text fragments (e.g., separating {{Client and Name}}). To resolve this, delete the placeholder completely from your template, type it back in using plain text, or disable Word’s AutoCorrect options.
Q: Can I run this macro on a Mac?
A: No. This specific macro relies heavily on Windows-exclusive COM Automation (CreateObject). Because the macOS version of Office does not support the COM architecture, this code will not execute on a Mac without significant rewrites utilizing AppleScript or modern Office Add-ins.
Wrap-Up
The architecture behind this Excel-to-Word automation system incorporates several software development best practices that are highly beneficial to learn:
- Defensive Programming: Every potential point of failure—missing files, empty data cells, or runtime crashes—is anticipated and guarded by validation code.
- Idempotency: Thanks to the Column F status marker, running the macro repeatedly will never generate redundant, duplicate documents for rows you have already processed.
- Modular Design: Isolating the core engine into an independent
ReplacePlaceholdersubroutine keeps the script organized, transparent, and incredibly reusable. - Late Binding: By bypassing direct dependencies on a specific version of the Microsoft Word Object Library, this file maintains excellent cross-version compatibility for end-users.
Take these structural concepts, apply them to your own office workflows, adjust your Word templates and columns accordingly, and you can easily construct a fully automated document processing pipeline for your department.
If this guide helped you conquer your administrative workload, feel free to share it with colleagues who are still stuck manually copy-pasting their paperwork!
If you run into any stubborn deployment bugs or operational issues, please don’t hesitate to reach out.
Recommended Reading & Next Steps
- To master the fundamentals of linking these two programs, read my companion guide: [Self-Taught Excel VBA Series: How to Control Word Using VBA].
- If you want to automate your email delivery next, check out: [Self-Taught Excel VBA Series: How to Control Outlook with VBA].
- Ready to eliminate office stress for good? Explore our ultimate breakdown: [The Complete Guide to Excel VBA Automation: From Basics to Enterprise Applications].
Have a unique office automation challenge you want to tackle? Head over to my [Contact Me] page to share your project requirements—I’m always happy to help you map out a solution!
✍️ WordPress Writer’s Pro-Tip:
When pasting this into your WordPress editor, link the highlighted bold text phrases ([Self-Taught Excel VBA Series...], [Contact etc ) directly to your internal posts and pages. Building a tight internal linking mesh drastically reduces your bounce rates and signals high authority to Google’s ranking algorithms!